If you want to get tenant ID of the domain associated with Azure Active Directory / Entra ID you can quickly check it by checking OpenID configuration. Just use the link:
and replace the domain you’re checking. In a result you will receive OpenID configuration, if exists, for such domain and in the token_endpoint URL you will find tenant ID to be a part of the URL, for example
Recently I’ve been having some issues with Python Azure Functions that after deployment the underlying container was down. Redeployment, restart doesn’t help and still you can see this screen.
🙁 Application Error If you are the application administrator, you can access the diagnostic resources.
After some investigation I’ve found out in Azure Function “Availability and Performance” diagnostics that there is a following error:
ERROR: unhandled error in functions worker: Descriptors cannot not be created directly.
After further checks it looks like it’s related to the profobuf library. Even though I’m not using it directly it looks like some of the libraries is using this library.
Solution
Add proper version to your requirements.txt file:
protobuf==3.20.*
and redeploy the app. This solution solved my problem.
##[error]The nuget command failed with exit code(1) and error(Problem starting the plugin 'C:\vsts-agents\smh-agent-3\_work\_tasks\NuGetCommand_333b11bd-d341-40d9-afcf-b32d5ce6f23b\2.211.0\CredentialProviderV2\plugins\netfx\CredentialProvider.Microsoft\CredentialProvider.Microsoft.exe'. Plugin 'CredentialProvider.Microsoft' failed within 6.581 seconds with exit code -1.
This annoying error was intermittent and happened mostly when several builds were running.
I’m using two steps related to NuGet: – NuGet tool installer v1 – NuGet v2 – configured for restoring packages for the project
I’ve discovered this thread on Visual Studio Developer Community that suggest that it may be an issue with default NuGet timeout, which is 5 seconds.
The suggestion is to increase the default timeout, which works for me.
I’ve set within build variables two new variables and so far it works better – no more CredentialProvider.Microsoft error.
If you have multiple Active Directory tenants you work with and you’d like to use Microsoft Graph Explorer to interact with Microsoft Graph API you often have a need to switch between tenants.
Unfortunately, as of now, Microsoft Graph Explorer does not support switching tenant in their standard view. There is a workaround though!
If you are already signed in with your main tenant, you will have to switch account – click on your profile and then Sign in with a different account. If you have account on the other tenant you should be able to switch account. After doing so, the information about the tenant (next to you profile) should be updated!
When you use Azure DevOps to deploy your projects you can connect it to Azure via different methods. The most convenient type of service connection is `Azure Resource Manager using service principal authentication`.
This type of connection creates application in your Azure Active Directory which is used as a Service Principal. Then for this application secret is generated, so Azure DevOps can connect to Azure. This secret token is expiring from time to time. The default time to live is 2 years but it may vary.
Once the secret is expired you will get this type of error when trying to deploy your code to Azure:
##[error]Error: Failed to get resource ID for resource type 'Microsoft.Web/Sites' and resource name 'XXX'. Error: Could not fetch access token for Azure. Verify if the Service Principal used is valid and not expired. For more information refer https://aka.ms/azureappservicedeploytsg
Error during deployment once secret for Service Principal expired.Continue Reading
Go to your SendGrid account and go to API Keys section.
Add new API Key with, at least, Mail Send permission.
Copy generated API Key. Your key should start with SG.
Grafana setup
You have to edit Grafana configuration. Refer to Grafana Configuration documentation on where to find your config file. For Bitnami Grafana distribution you can find it here: /opt/bitnami/grafana/conf/grafana.ini
Look for [smtp] section and either update existing one or add new one
from_adress – looks like you can put anything you want but I would recommend to put verified email address you have in SendGrid – check the Sender Authentication section.
If you have Azure Log Analytics or Application Insights, where you have different data sources, like exceptions, requests, traces, customEvents, you may want to search for some certain phrase everywhere, because you don’t know in which data source you should check or in which column.
There is quite handy way of doing that – search in query.
Quick example:
search in (exceptions, requests, traces, customEvents) "ManagedIdentityCredential"
Adding a tag to your build in Azure DevOps is very useful – you can use it later on with releases to accept only builds with certain tags. That comes in handy when you are building a project with many different configurations which you will, later on, deploy via different releases. For example:
You can use it on client basis or environment basis like dev, uat, prod.
You can add as tag whatever you want. For example variable value that you can set, when you are starting the build. You can skip next step if you want to use existing variable in your pipeline.
Create variable in your build pipeline
Create or edit your existing pipeline.
Go to Variables/Pipeline variables tab.
Add your variable, for example EnvironmentTag and add default value.
Select Settable at queue time to make sure that you can change it when you are scheduling your build.
Creating variable in build pipeline.
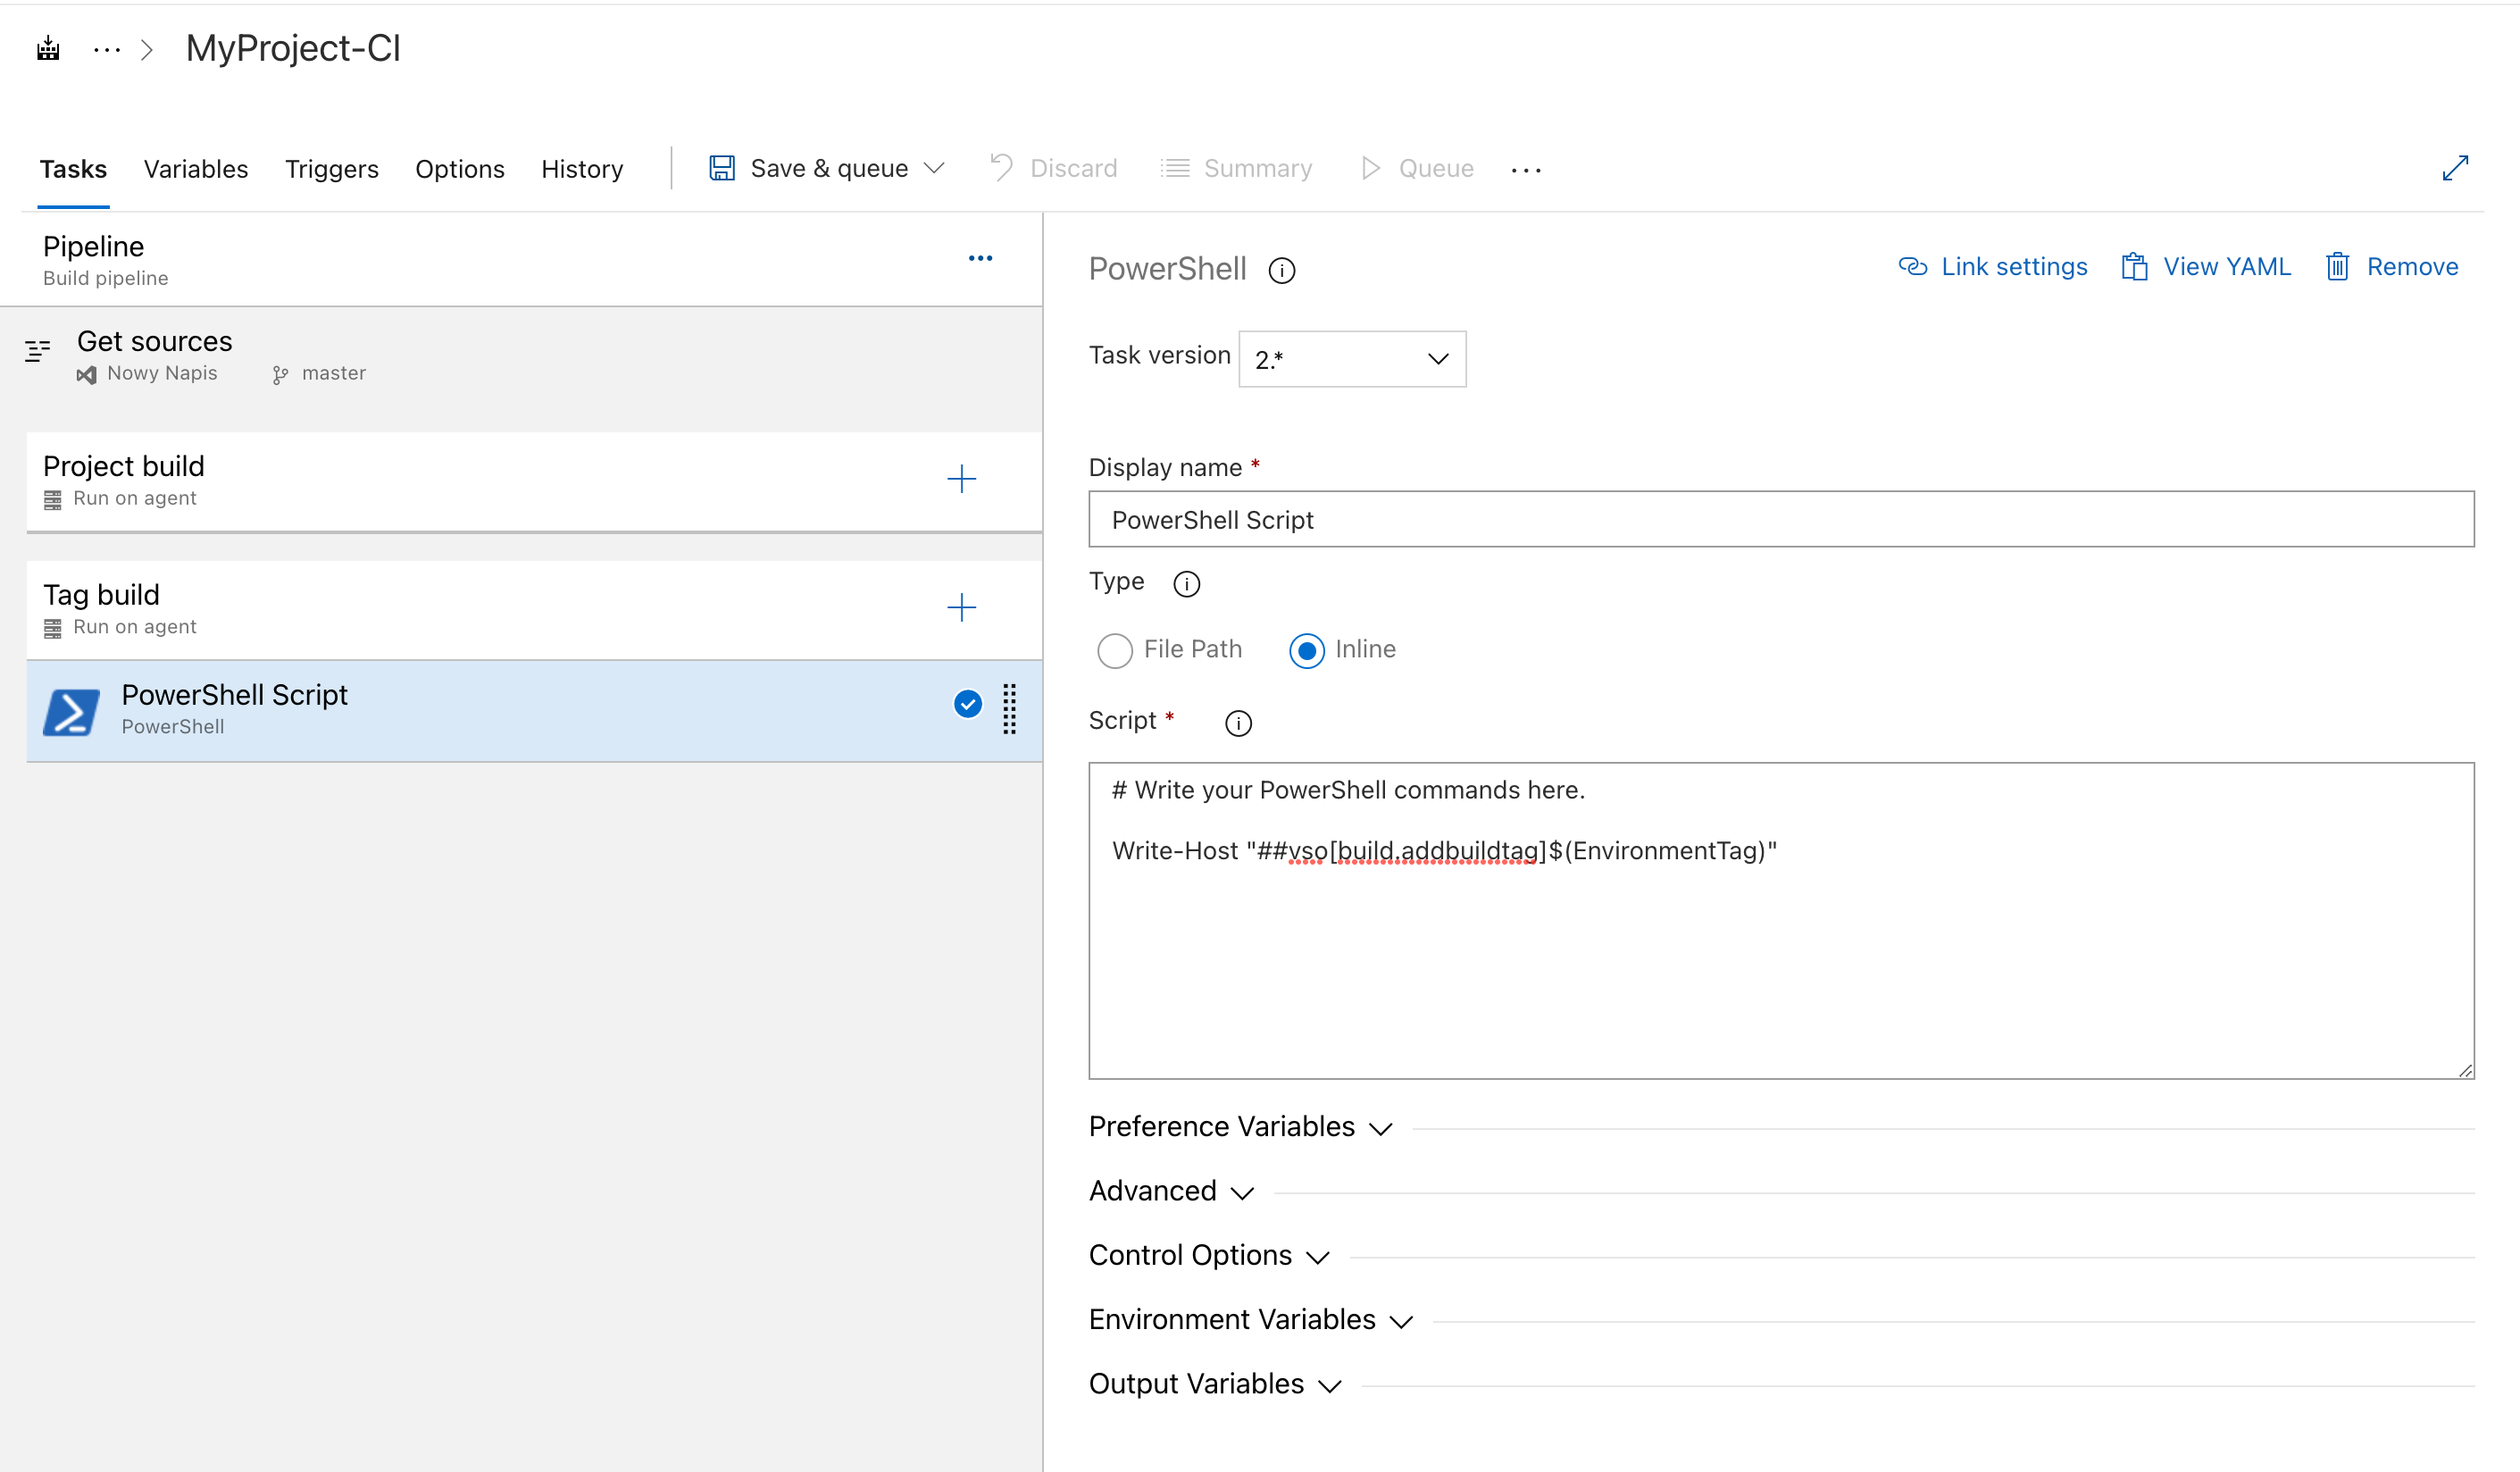
Add a stage to tag your build
Go to the Tasks tab.
It’s good to have 2 stages – one to perform all the tasks related to your build and the other to tag the build.
Add PowerShell or Bash task that will add tag based on EnvironmentTag variable value: Write-Host "##vso[build.addbuildtag]$(EnvironmentTag)"
Adding new stage with Powershell task to tag build.
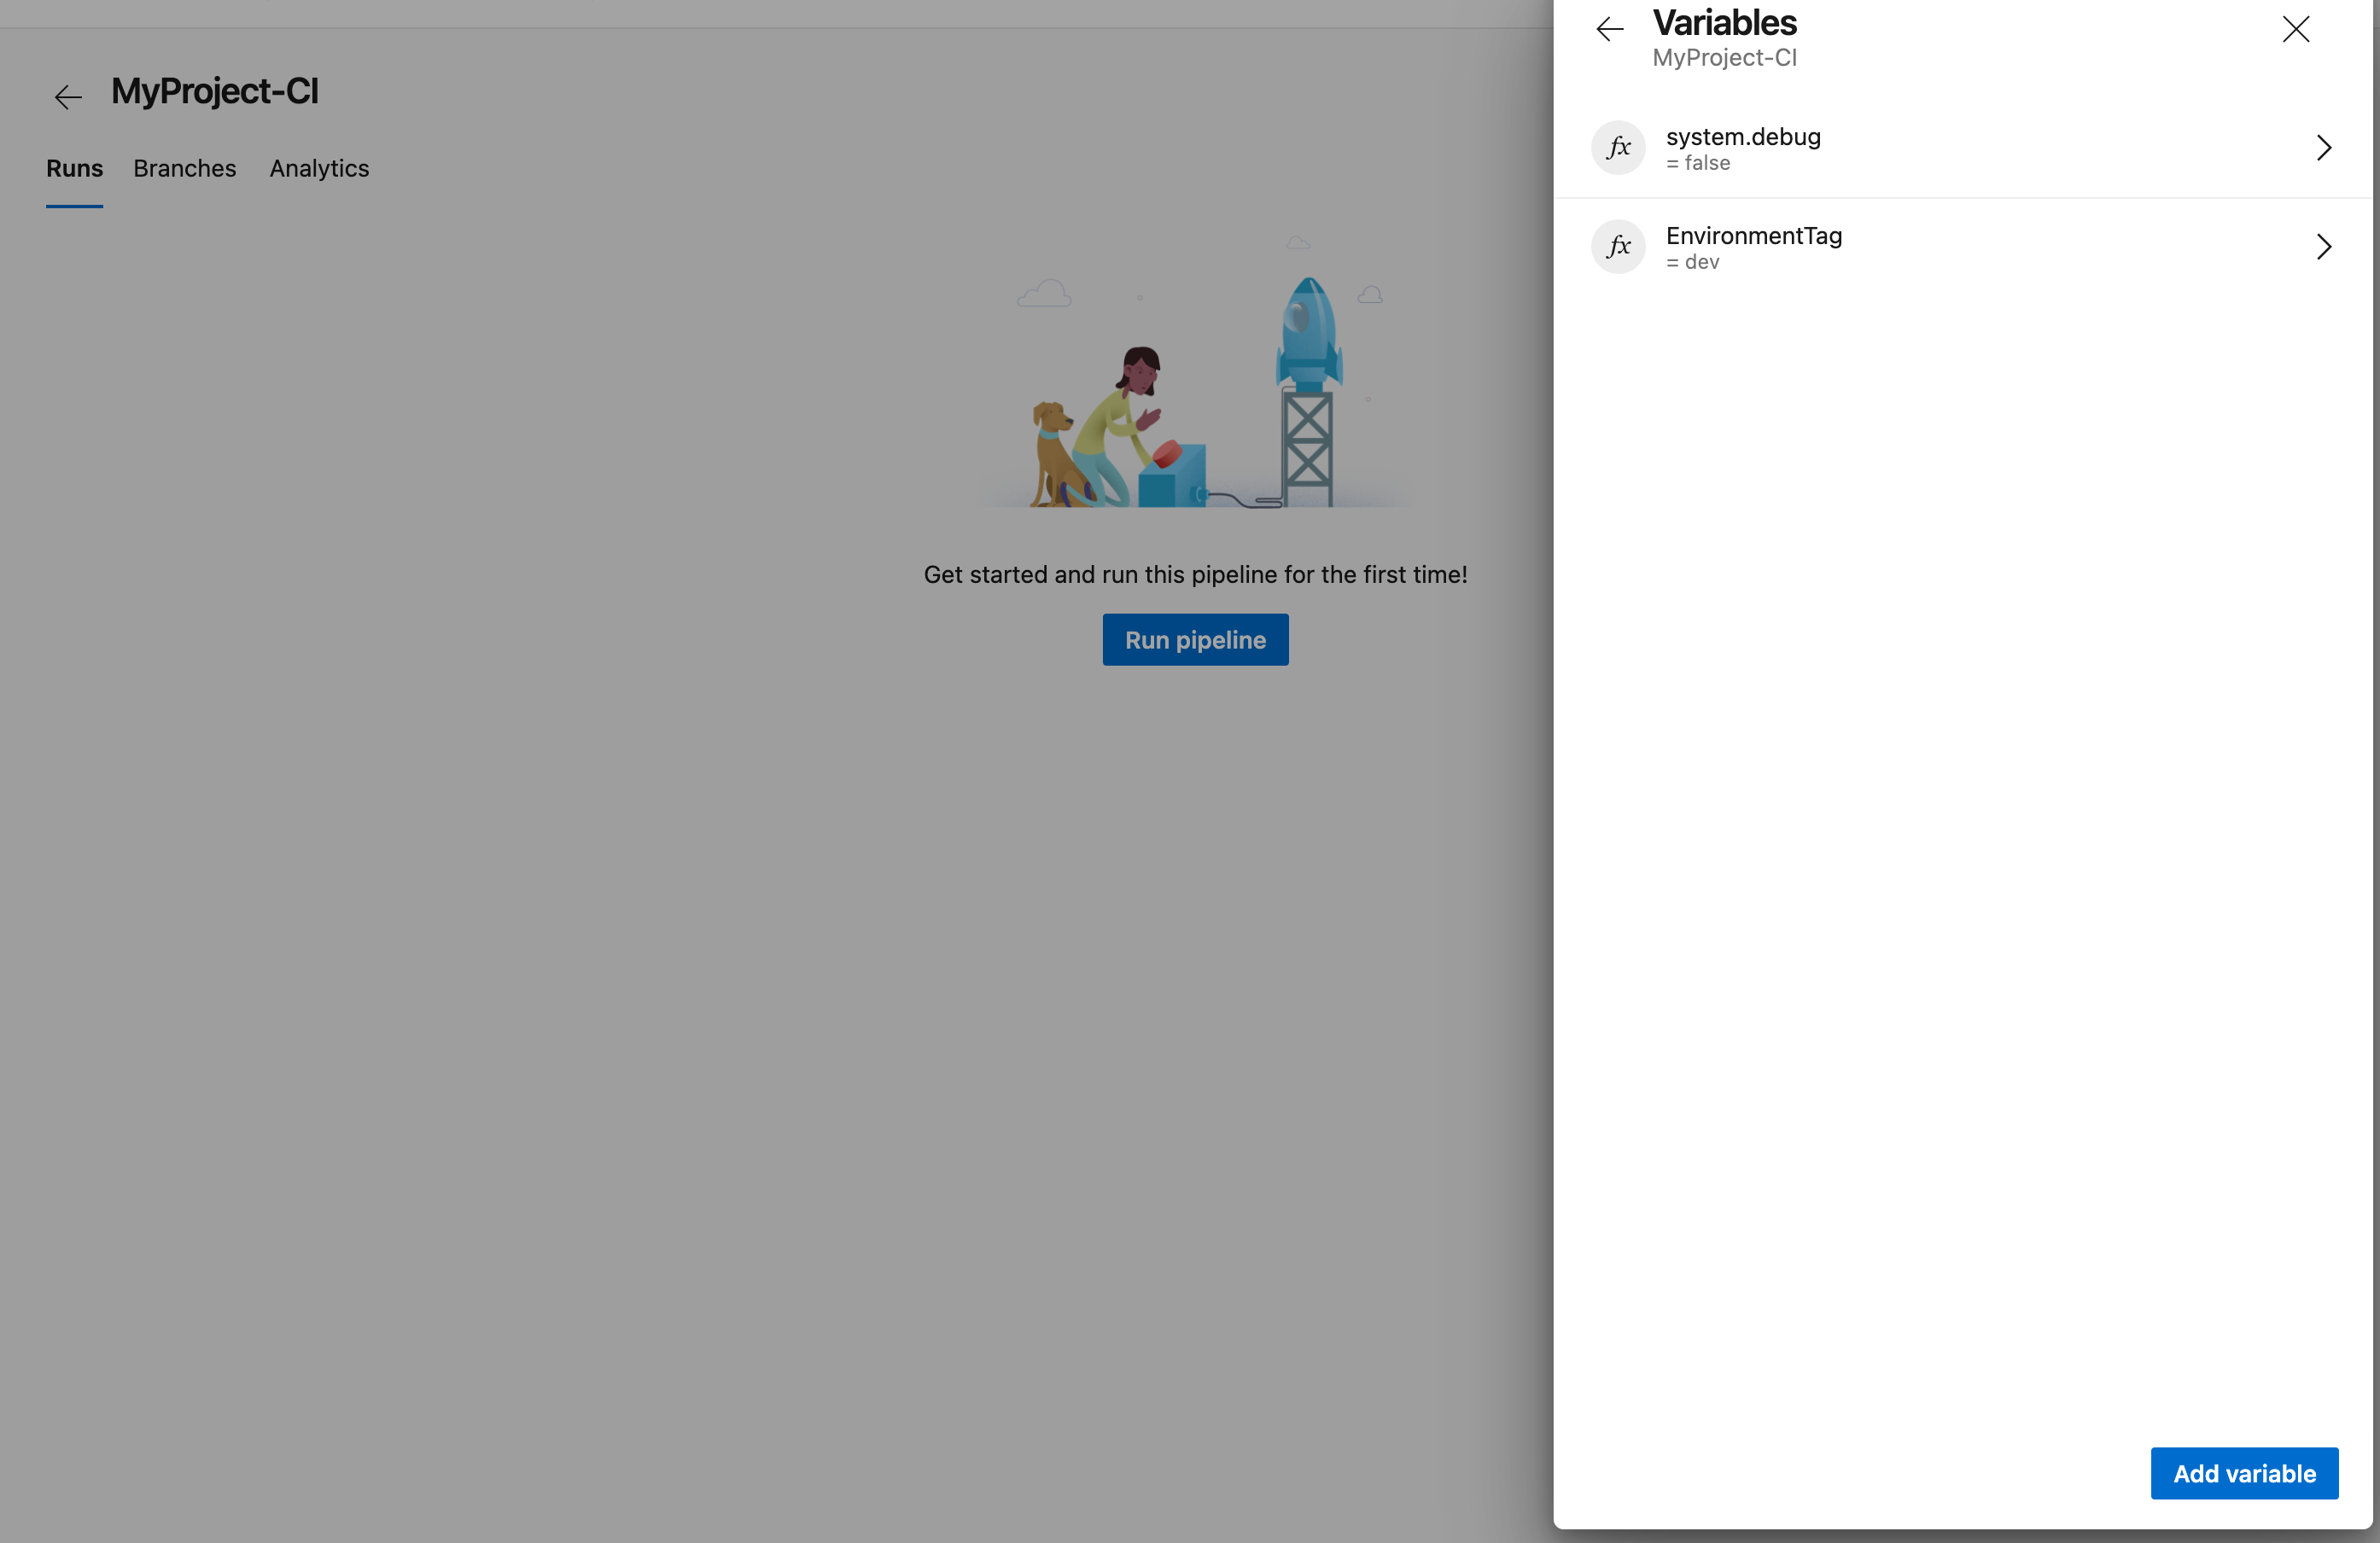
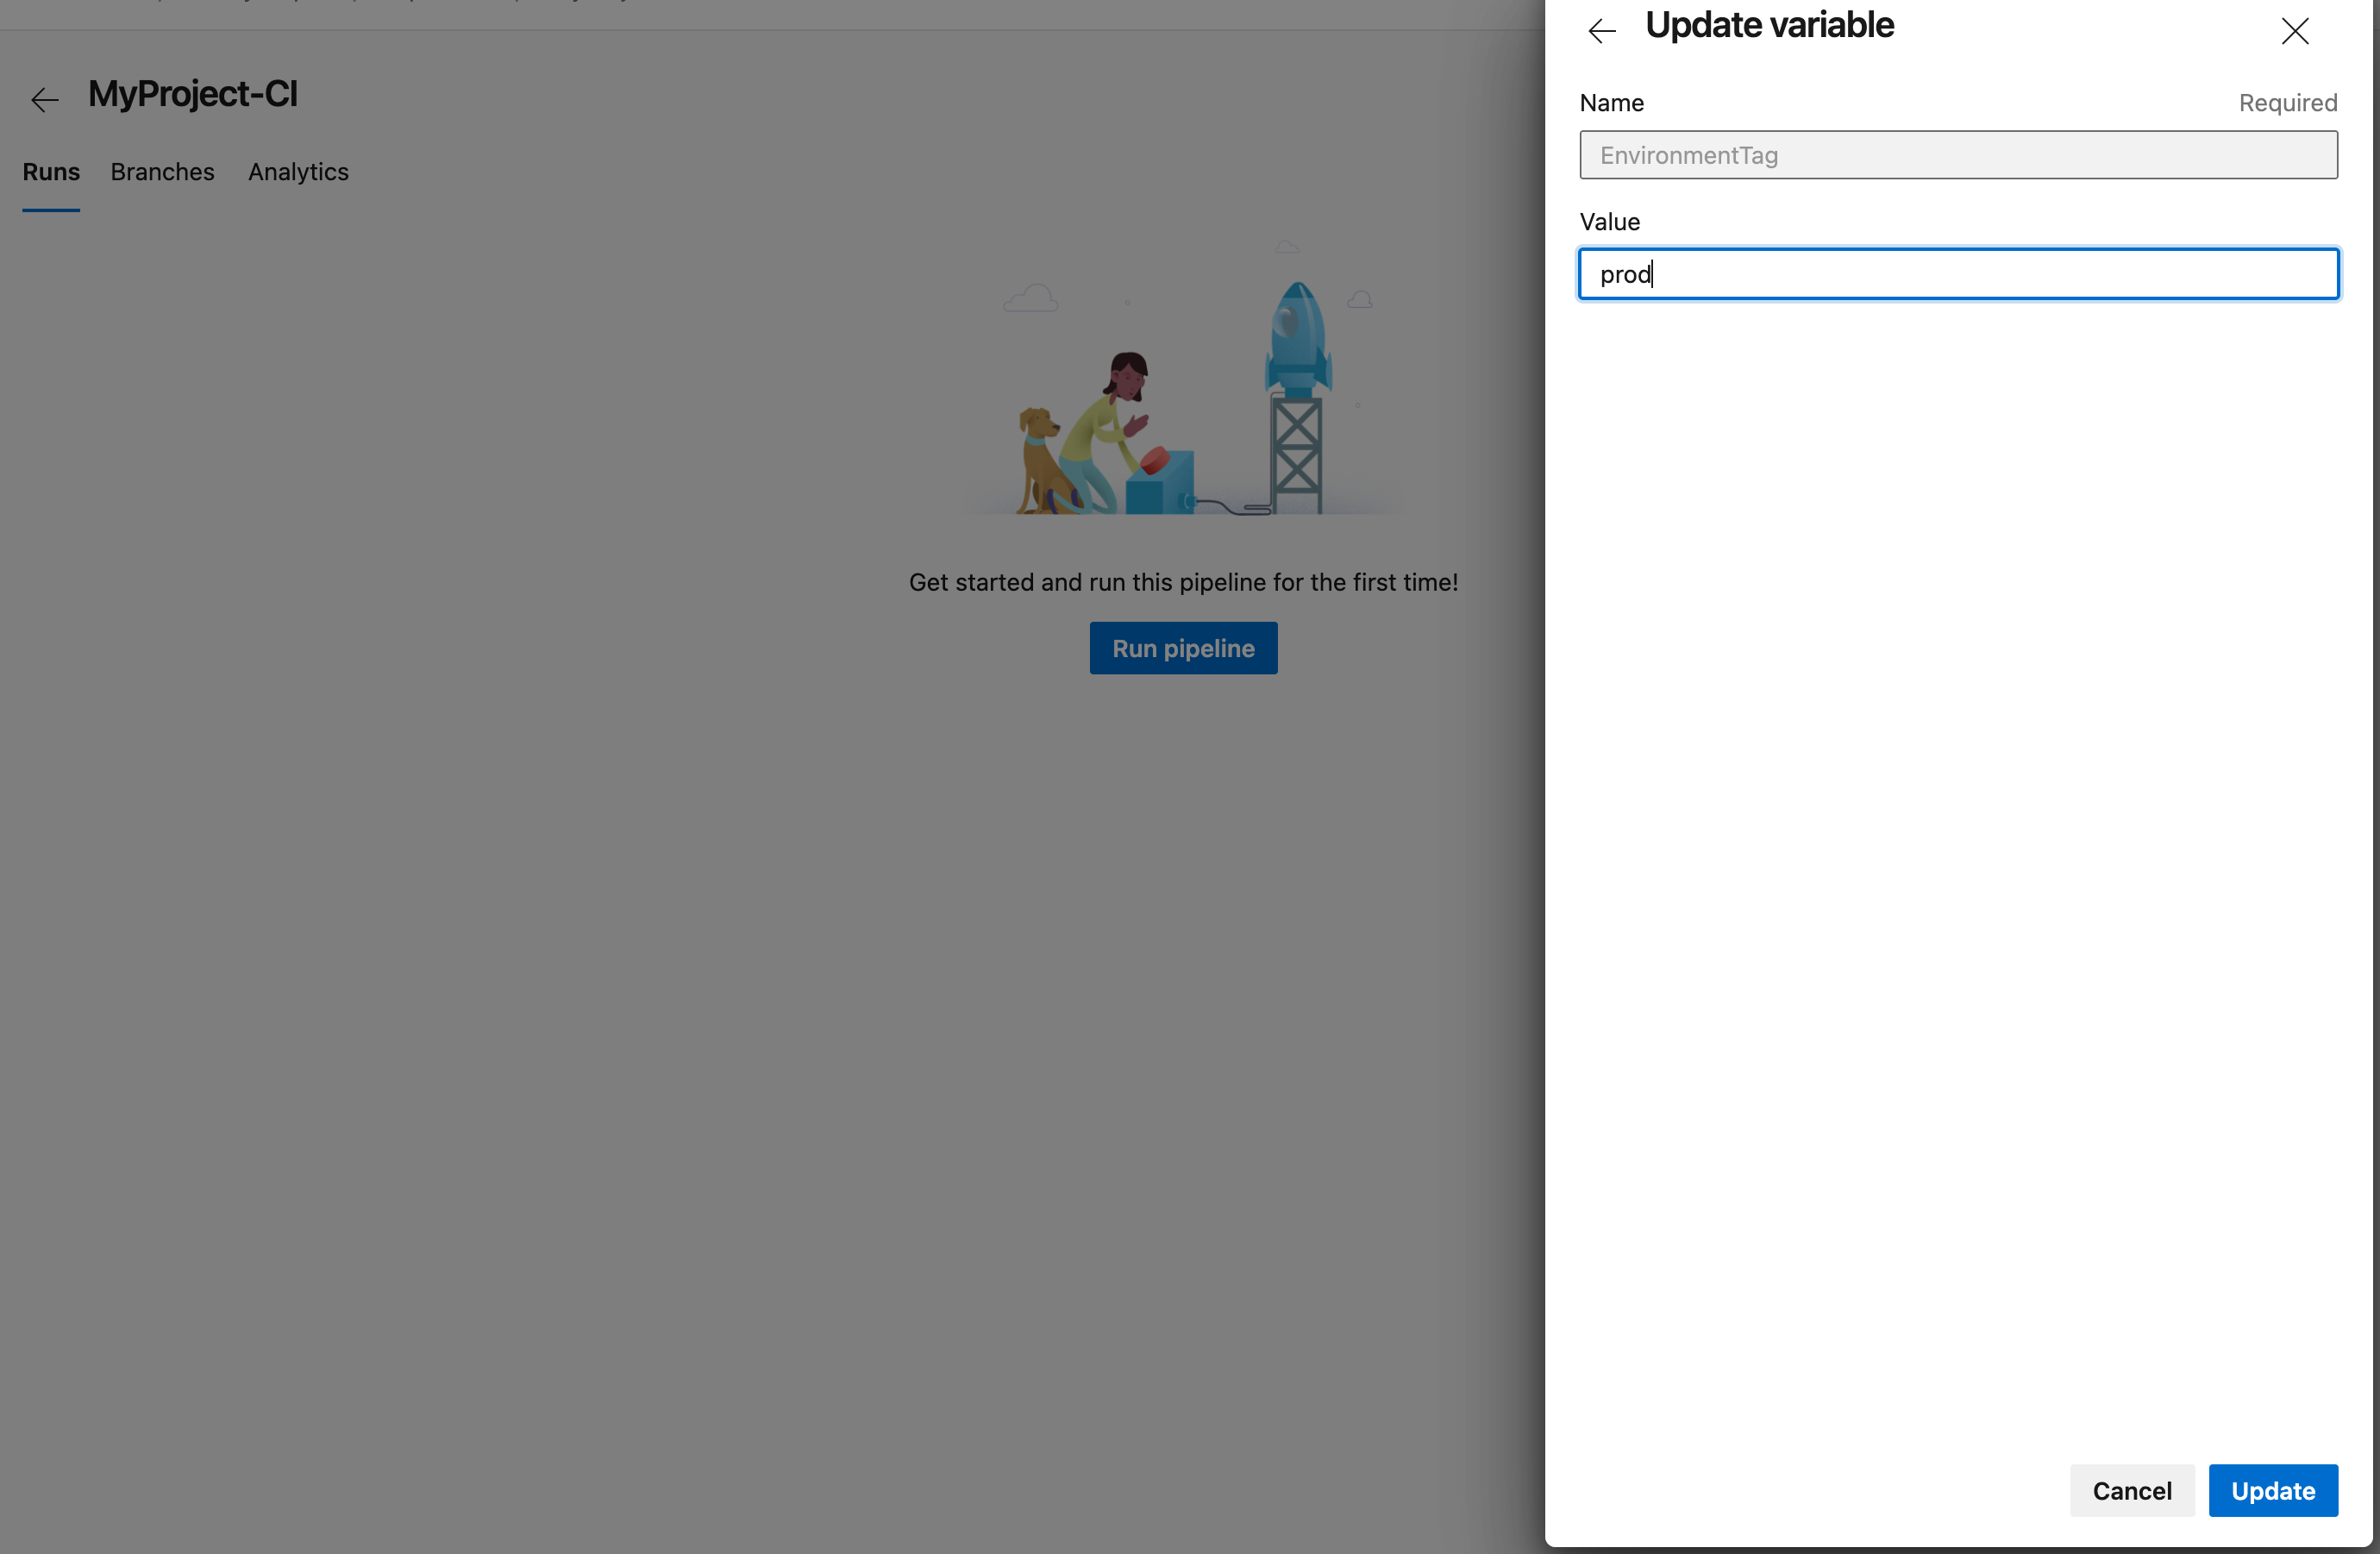
Execute pipeline
When you go to the build pipeline summary and go to Run pipeline you should be able to go to Variables and change EnvironmentTag value.
Run your pipeline.Select Variables section.Change EnvironmentTag value.
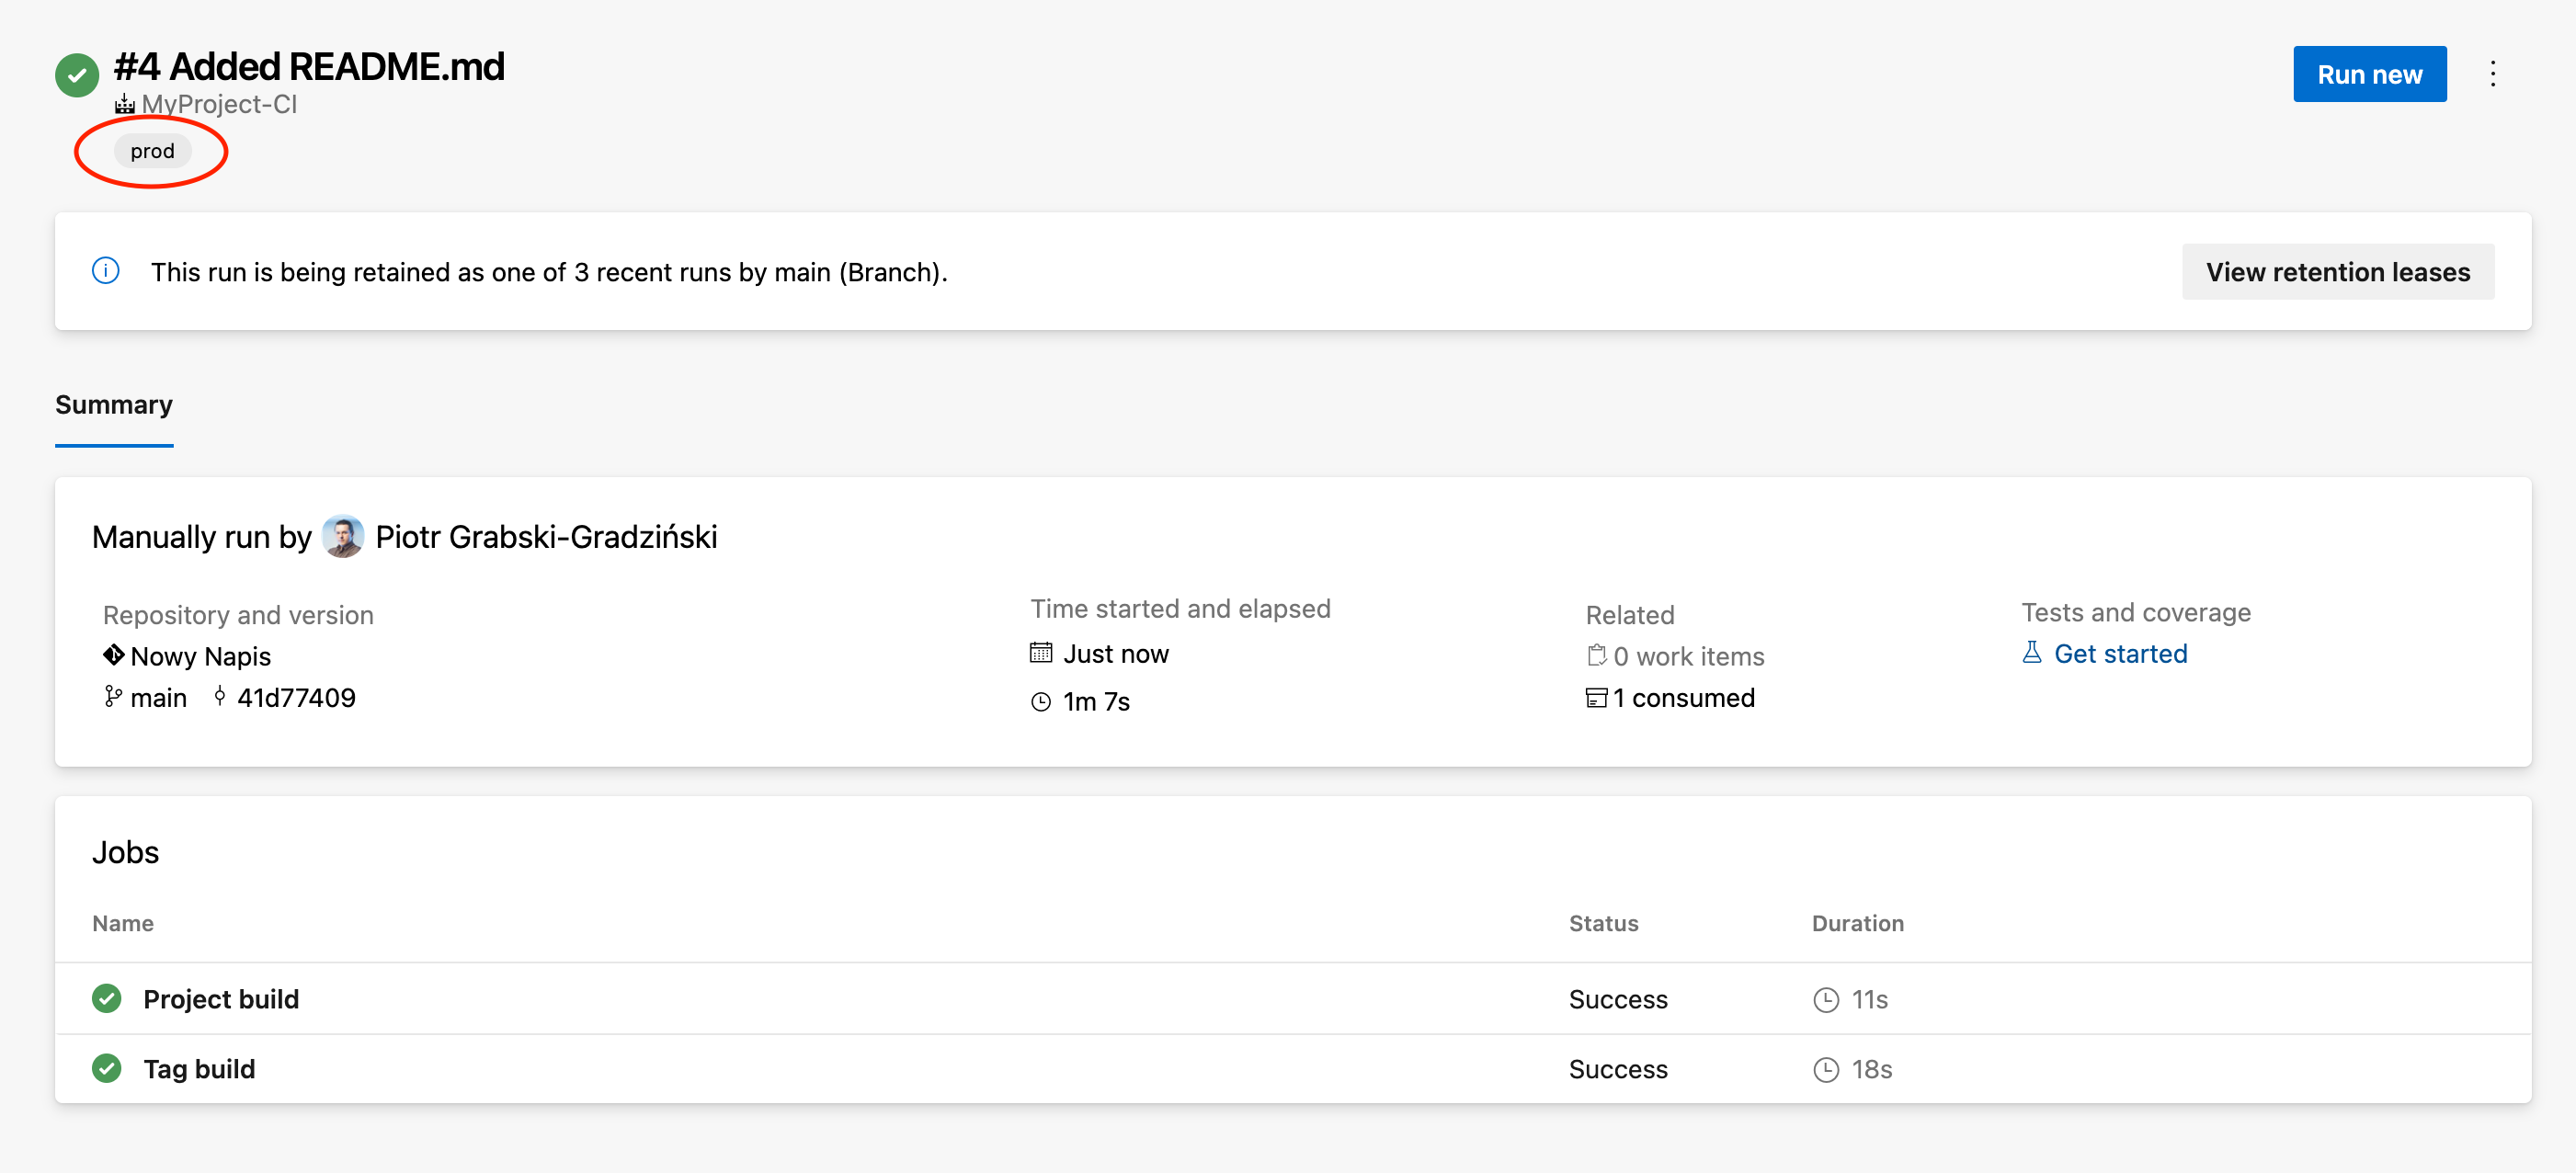
Check your tag
Once your build is completed you can go to your build and check if you have your tag in there.
Use tags in release pipelines
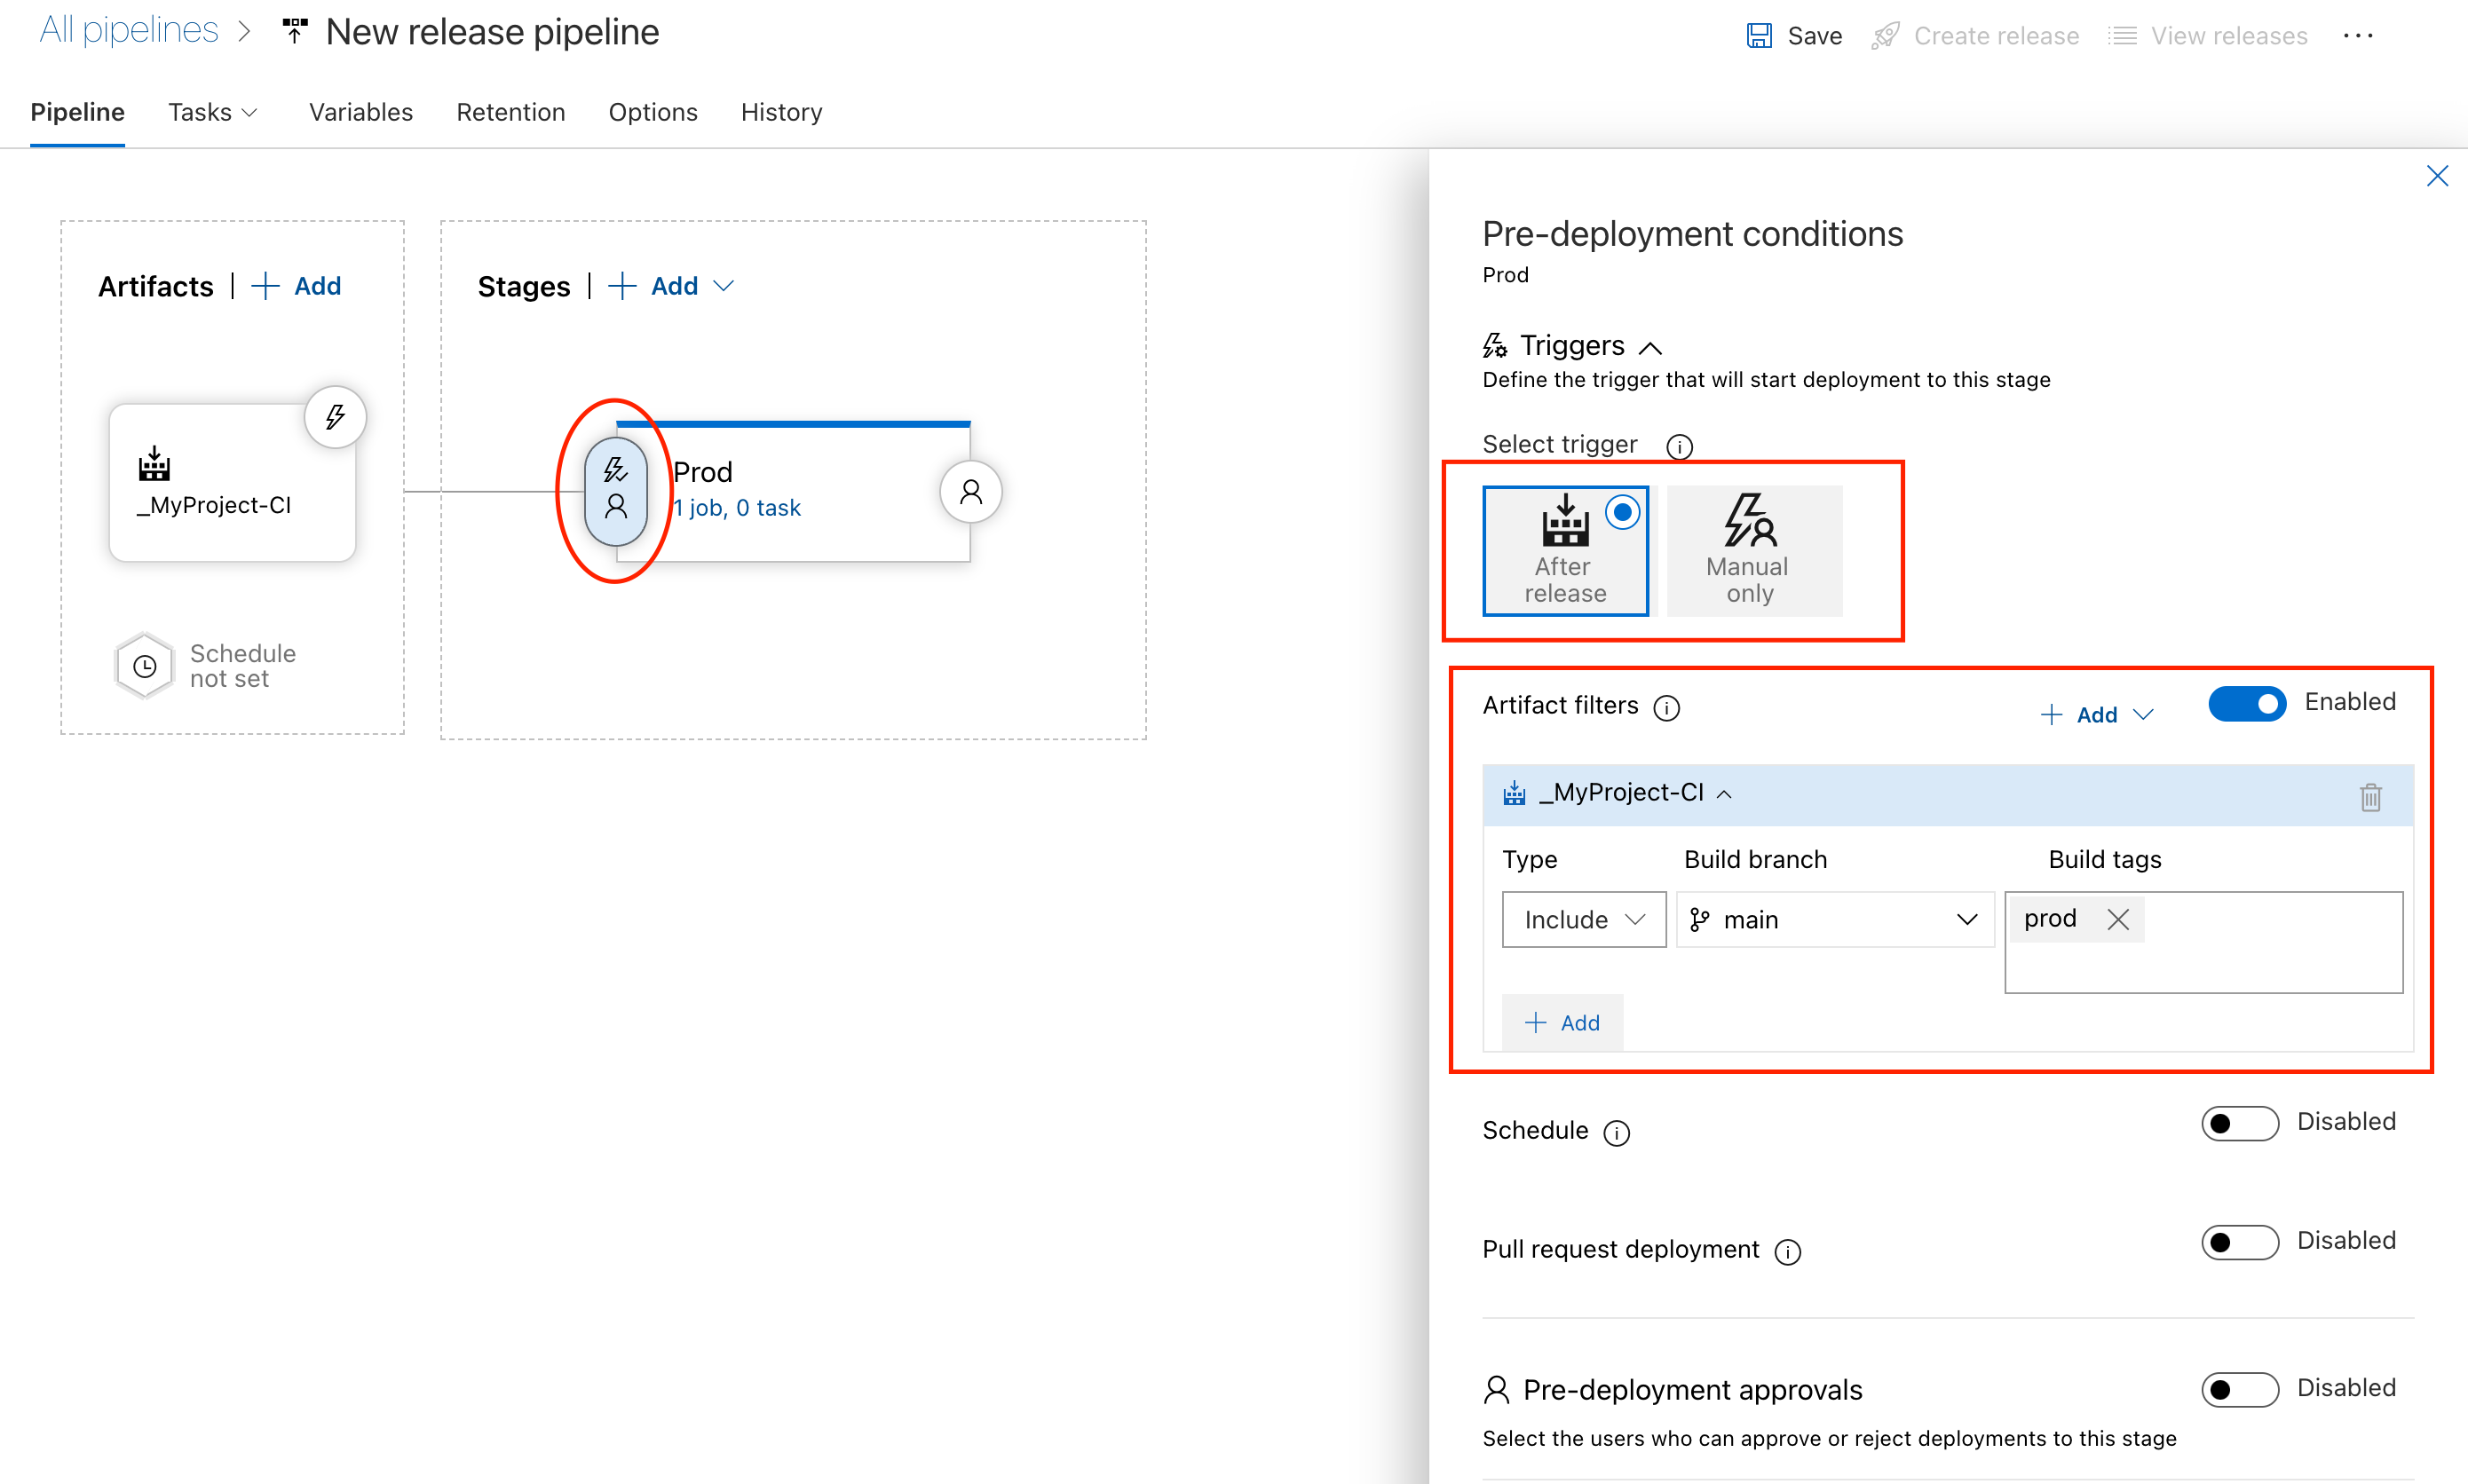
Once we have our build tagged, we can use that information on the release pipeline level, and for example trigger, automatic trigger based on branch and tag. Go to your release pipeline and edit the Pre-deployment conditions for your stage. In this example, I want to do an automatic release of Prod stage once the build from branch main and with tag prod is created.
Automatic release once build from main branch with prod tag is created.